

How To Attach An Animation To An Avatar In Unity
Importing a model with non-humanoid (generic) animations
Importing a model with humanoid animations
This page contains guidance on importing a model for use with Unity's Animation Organisation. For data on creating a model for use with the Animation System, see Creating models for animation.
The Animation System works with 2 types of models:
- A Humanoid model is a specific structure, containing at least fifteen bones organized in a way that loosely conforms to an actual human skeleton. This folio contains guidance on importing this blazon of model.
- A Generic model is everything else. This might be annihilation from a teakettle to a dragon. For information on importing this type of model, see Importing a model with non-humanoid (generic) animations.
For full general importing guidance that is applicative to all types of models, see Importing a model.
Overview
When Unity imports Model files that contain Humanoid Rigs and Animation, it needs to reconcile the bone structure of the Model to its Animation. It does this past mapping each bone in the file to a Humanoid Avatar and so that information technology can play the Animation properly. For this reason, it is important to carefully prepare your Model file A file containing a 3D data, which may include definitions for meshes, bones, blitheness, materials and textures. More info
See in Glossary before importing into Unity.
- Ascertain the Rig type and create the Avatar.
- Right or verify the Avatar's mapping.
- Once you are finished with the os mapping, you tin optionally click the Muscles & Settings tab to tweak the Avatar'southward musculus configuration.
- You can optionally save the mapping of your skeleton's bones to the Avatar equally a Human Template A pre-defined bone-mapping. Used for matching basic from FBX files to the Avatar. More info
See in Glossary (.ht) file. - You tin can optionally limit the animation that gets imported on certain bones by defining an Avatar Mask.
- From the Animation tab, enable the Import Animation choice and then set the other Asset-specific properties, .
- If the file consists of multiple animations or actions, you tin can define specific activeness ranges every bit Animation Clips.
- For each Animation Clip Animation data that can be used for animated characters or elementary animations. It is a simple "unit of measurement" piece of move, such as (one specific case of) "Idle", "Walk" or "Run". More info
See in Glossary divers in the file, you tin can:- Modify the pose and root transform
- Optimize looping
- Mirror the animation on both sides of the Humanoid skeleton.
- Add curves to the clip in order to animate the timings of other items
- Add events to the clip in order to trigger sure actions in fourth dimension with the animation
- Discard part of the animation similar to using a runtime Avatar Mask but applied at import time
- Select a dissimilar Root Motion Node to drive the action from
- Read any messages from Unity about importing the clip
- Watch a preview of the animation clip
- To save your changes, click the Utilize button at the bottom of the Import Settings window or Revert to discard your changes.
Set the Avatar
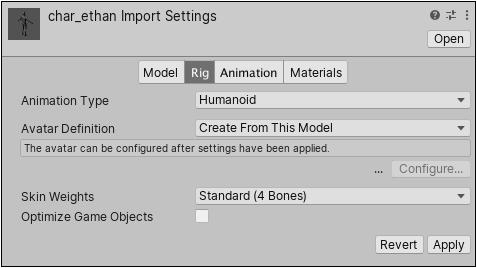
From the Rig tab of the Inspector window, set the Animation Type to Humanoid. By default, the Avatar Definition property is prepare to Create From This Model. If yous continue this choice, Unity attempts to map the prepare of bones divers in the file to a Humanoid Avatar.
In some cases, you lot can change this option to Copy From Other Avatar to use an Avatar you already divers for some other Model file. For example, if you create a Mesh The main graphics primitive of Unity. Meshes make upward a large part of your 3D worlds. Unity supports triangulated or Quadrangulated polygon meshes. Nurbs, Nurms, Subdiv surfaces must be converted to polygons. More info
See in Glossary (pare) in your 3D modeling application with several distinct animations, you tin can export the Mesh to ane FBX file, and each animation to its own FBX file. When you import these files into Unity, you only demand to create a single Avatar for the start file you lot import (usually the Mesh). As long as all the files use the aforementioned bone structure, you can re-employ that Avatar for the remainder of the files (for instance, all the animations).
If you enable this option, y'all must specify which Avatar y'all want to use past setting the Source property.
You tin also change the maximum number of bones that tin can influence a given vertex with the Pare Weights property. By default, this property limits influence to four basic, only yous can a different number.
When you click the Utilize button, Unity tries to lucifer up the existing bone structure to the Avatar bone structure. In many cases, it can do this automatically by analyzing the connections between bones in the rig.
If the match succeeds, a check mark appears next to the Configure bill of fare. Unity also adds an Avatar sub-Nugget to the Model Asset, which you can find in the Project view.
A successful match simply ways that Unity was able to match all of the required bones. However, for better results, you also need to match the optional bones and set the model in a proper T-pose The pose in which the character has their arms straight out to the sides, forming a "T". The required pose for the character to be in, in order to make an Avatar.
Run into in Glossary .
If Unity tin can't create the Avatar, a cross appears adjacent to the Configure button, and no Avatar sub-nugget appears in the Projection view.
Since the Avatar is such an important aspect of the animation organization, it is important to configure it properly for your Model A 3D model representation of an object, such as a character, a building, or a article of furniture. More info
See in Glossary .
For this reason, whether or non the automatic Avatar creation succeeds, yous should always bank check that your Avatar is valid and properly set up.
Configure the Avatar
If you want to check that Unity correctly mapped your model's bones to the Avatar, or if Unity failed to create the Avatar for your model, you tin click the Configure … push button on the Rig A skeletal hierarchy of joints for a mesh. More than info
Run across in Glossary tab to enter the Avatar configuration style.
If Unity successfully creates an Avatar, the Avatar appears as a sub-asset of the model Asset. You tin can select the Avatar nugget in the Project window A window that shows the contents of your Assets folder (Projection tab) More info
See in Glossary , and and so click the "Configure Avatar" button in the Inspector to enter the Avatar configuration mode. This style allows to check or adjust how Unity maps your model'due south bones to the Avatar layout.
In one case you take entered the Avatar configuration mode, the Avatar window appears in the Inspector A Unity window that displays data near the currently selected GameObject, asset or project settings, allowing you to audit and edit the values. More info
See in Glossary displaying os mapping.
Brand certain the bone mapping is correct and that you map any optional basic that Unity did not assign.
Your skeleton needs to have at least the required bones in identify for Unity to produce a valid match. In society to improve your chances for finding a friction match to the Avatar, name your bones in a way that reflects the trunk parts they represent. For example, "LeftArm" and "RightForearm" brand information technology clear what these basic control.
Mapping strategies
If the model does non yield a valid match, you can use a like process to the 1 that Unity uses internally:
- Choose Articulate from the Mapping menu at the bottom of the Avatar window to reset whatsoever mapping that Unity attempted.
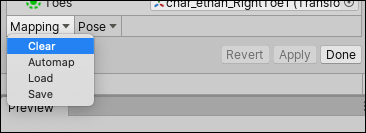
- Choose Sample Bind-pose from the Pose menu at the bottom of the Avatar window to guess the Model's initial modeling pose.
- Choose Mapping > Automap to create a bone-mapping from an initial pose.
- Choose Pose > Enforce T-Pose to set up the Model back to to required T-pose.
If automapping fails completely or partially, yous can manually assign bones by either dragging them from the Scene A Scene contains the environments and menus of your game. Think of each unique Scene file as a unique level. In each Scene, you identify your environments, obstacles, and decorations, essentially designing and building your game in pieces. More info
See in Glossary view or from the Hierarchy view. If Unity thinks a bone fits, it appears in light-green in the Avatar Mapping tab; otherwise information technology appears in red.
Resetting the pose
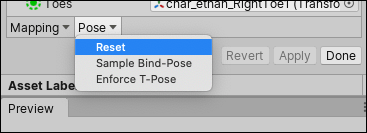
The T-pose is the default pose required past Unity animation and is the recommended pose to model in your 3D modeling application. However, if you lot did non use the T-pose to model your character and the animation does not work equally expected, you tin can select Reset from the Pose drop-downwardly card:
If the os assignment is correct, but the grapheme is not in the correct pose, you will see the bulletin "Character not in T-Pose". You can try to set up that past choosing Enforce T-Pose from the Pose menu. If the pose is still not correct, you lot can manually rotate the remaining bones into a T-pose.
Creating an Avatar Mask
Masking allows you to discard some of the blitheness data within a prune, assuasive the clip to animate only parts of the object or graphic symbol rather than the entire thing. For instance, you may have a standard walking animation that includes both arm and leg motion, but if a character is carrying a big object with both hands and then you lot wouldn't desire their arms to swing to the side every bit they walk. However, you could notwithstanding utilise the standard walking animation while carrying the object by using a mask to only play the upper torso portion of the conveying animation over the top of the walking animation.
You lot can apply masking to animation clips either during import time, or at runtime. Masking during import time is preferable, because it allows the discarded animation data to exist omitted from your build, making the files smaller and therefore using less memory. It also makes for faster processing because there is less blitheness data to exist blended at runtime. In some cases, import masking may not be suitable for your purposes. In that case, you can apply a mask at runtime past creating an Avatar Mask A specification for which body parts to include or exclude for an blitheness rig. Used in Animation Layers and in the importer. More info
Run into in Glossary Asset, and using it in the layer settings of your Animator Controller Controls animation through Animation Layers with Animation State Machines and Animation Alloy Trees, controlled by Blitheness Parameters. The same Animator Controller can be referenced by multiple models with Animator components. More info
Come across in Glossary .
To create an empty Avatar Mask Nugget, you lot can either:
- Cull Create > Avatar Mask from the Assets Whatever media or data that can exist used in your game or project. An asset may come from a file created outside of Unity, such as a 3D Model, an audio file or an epitome. You tin also create some nugget types in Unity, such as an Animator Controller, an Sound Mixer or a Return Texture. More info
See in Glossary menu. - Click the Model object yous desire to ascertain the mask on in the Project In Unity, yous use a project to pattern and develop a game. A project stores all of the files that are related to a game, such every bit the asset and Scene files. More info
Meet in Glossary view, and then right-click and choose Create > Avatar Mask.
The new Asset appears in the Project view:
You lot can at present add portions of the trunk to the mask so add together the mask to either an Blitheness LayerAn Blitheness Layer contains an Blitheness Land Auto that controls animations of a model or function of it. An example of this is if you have a total-body layer for walking or jumping and a higher layer for upper-body motions such as throwing an object or shooting. The higher layers take precedence for the body parts they control. More info
Run into in Glossary or add together a reference to it under the MaskCan refer to a Sprite Mask, a UI Mask, or a Layer Mask More info
Encounter in Glossary section of the Animation tab.
Importing a model with non-humanoid (generic) animations
Source: https://docs.unity3d.com/Manual/ConfiguringtheAvatar.html
Posted by: nelsonhadvaid.blogspot.com
0 Response to "How To Attach An Animation To An Avatar In Unity"
Post a Comment